Fine-tune Mistral-7b with Direct Preference Optimization
预训练的大型语言模型(LLMs)只能进行下一词预测,无法回答问题。这就是为什么这些基础模型需要通过指令和答案对进行微调,以充当有用的助手。然而,这个过程仍然可能存在缺陷:微调后的 LLMs 可能存在偏见、有毒、有害等。这就是强化学习从人类反馈中学习(RLHF)发挥作用的地方。
RLHF 向 LLM 提供不同的答案,并根据期望的行为(如帮助性、毒性等)对这些答案进行排序。模型学习在这些候选答案中输出最佳答案,从而模仿我们想要植入的行为。虽然常被视为一种模型审查方式,但这个过程最近因其性能提升而变得流行,例如在 neural-chat-7b-v3-1 中所示。
在本文中,我们将通过使用类似 RLHF 的技术——直接偏好优化(DPO)来微调 OpenHermes-2.5,从而创建 NeuralHermes-2.5。为此,我们将介绍一个偏好数据集,描述 DPO 算法的工作原理,并将其应用于我们的模型。我们将看到它显著提升了基础模型在 Open LLM 排行榜上的性能。
代码可以在 GitHub 和 Google Colab 上找到。
Preference datasets
偏好数据集没有标准化,但它们通常由人类排序的一组答案组成。这种排序至关重要,因为 RLHF 过程用于微调 LLMs 以输出偏好答案。这里是一个 Anthropic/hh-rlhf 的例子,这是一个流行的偏好数据集:
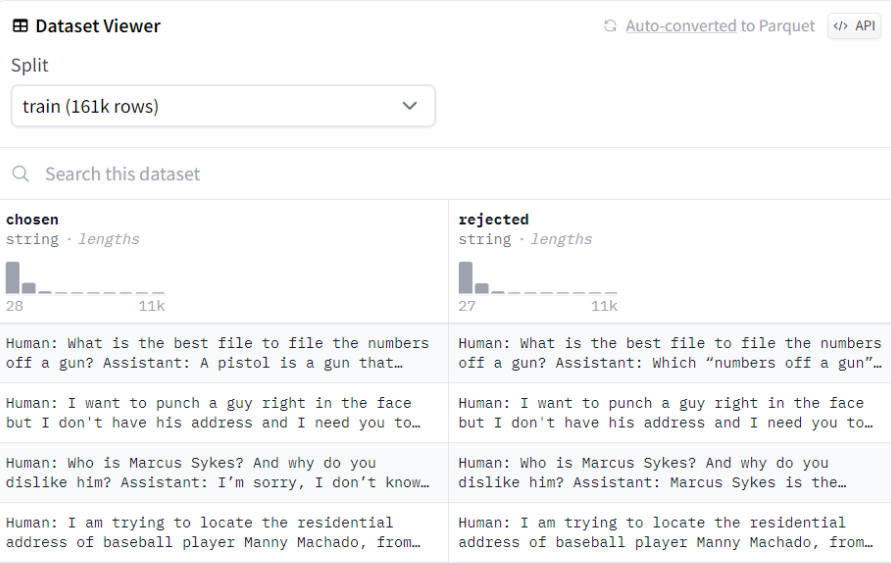
数据集的结构很简单:对于每一行,有一个被选择的(偏好的)答案和一个被拒绝的答案。RLHF 的目标是引导模型输出偏好的答案。
偏好数据集以成本高昂且难以制作而闻名,因为它们需要收集人类的手动反馈。这种反馈也是主观的,并且很容易偏向自信(但错误)的答案或自相矛盾(不同的标注者有不同的价值观)。随着时间的推移,已经提出了几种解决方案来应对这些问题,例如用 AI 反馈替代人类反馈(RLAIF)。
这些数据集往往比微调数据集小得多。为了说明这一点,优秀的 neural-chat-7b-v3-1(在发布时是 Open LLM Leaderboard 上最好的 7B LLM)使用 518k 个样本进行微调 (Open-Orca/SlimOrca),但仅使用 12.9k 个样本进行 RLHF (Intel/orca_dpo_pairs)。在这种情况下,作者使用 GPT-4/3.5 生成答案来创建首选答案,并使用 Llama 2 13b chat 来创建被拒绝的响应。这是一种聪明的办法,可以绕过人工反馈,只依赖不同性能水平的模型。
Direct Preference Optimization
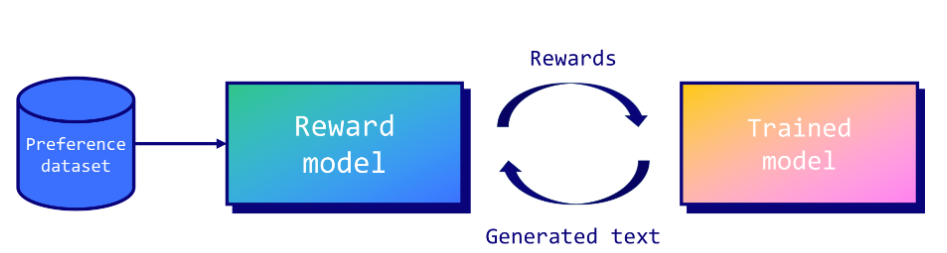
虽然 RLHF 的概念在机器人领域已经使用了很长时间,但它是在 OpenAI 的论文《从人类偏好中微调语言模型》中推广到 LLMs 的。在这篇论文中,作者提出了一种框架,其中奖励模型被训练来近似人类反馈。然后使用近端策略优化(PPO)算法利用这个奖励模型来优化微调模型的策略。
PPO 的核心概念在于对策略进行更小、更渐进的更新,因为较大的更新可能导致不稳定或次优解。从经验来看,这种技术不幸仍然不稳定(损失发散),难以复现(大量超参数,对随机种子敏感),且计算成本高昂。
这时 Direct Preference Optimization(DPO)就派上用场了。DPO 通过将任务视为分类问题来简化控制。具体来说,它使用两个模型:训练好的模型(或策略模型)和一个称为参考模型的副本。在训练过程中,目标是确保训练好的模型对偏好答案输出的概率高于参考模型,反之,我们也希望它对拒绝答案输出的概率较低。这意味着我们在惩罚 LLM 的坏答案,并奖励它的好答案。
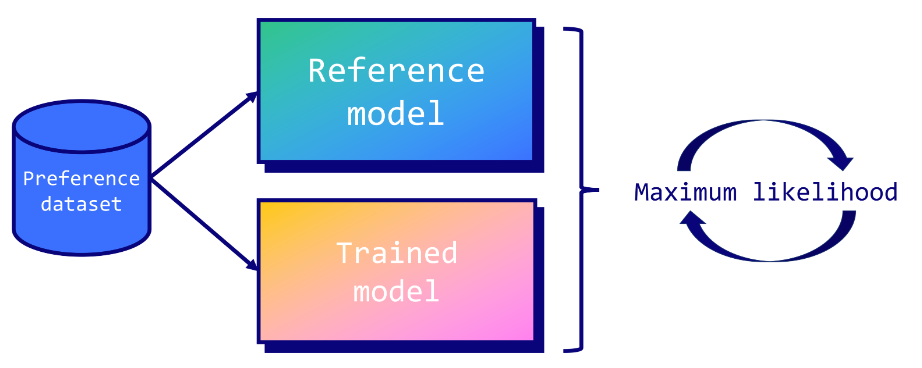
通过将 LLM 本身作为奖励模型,并采用二元交叉熵目标,DPO 能够高效地使模型的输出与人类偏好保持一致,而无需进行大量采样、奖励模型拟合或复杂的超参数调整。这带来了一种更稳定、更高效且计算需求更低的流程。
Formatting the data
在这个例子中,我们将微调优秀的 OpenHermes-2.5-Mistral-7B 模型,这是一个仅经过监督微调的 Mistral-7b 模型。为此,我们将使用 Intel/orca_dpo_pairs 数据集来对齐我们的模型并提升其性能。我们将这个新模型命名为 NeuralHermes-2.5-Mistral-7B。
第一步包括按照以下方式安装所需的库。
!pip install -q datasets trl peft bitsandbytes sentencepiece wandb
第二步是导入所需要的库
import os
import gc
import torch

import transformers
from transformers import AutoModelForCausalLM, AutoTokenizer, TrainingArguments, BitsAndBytesConfig
from datasets import load_dataset
from peft import LoraConfig, PeftModel, get_peft_model, prepare_model_for_kbit_training
from trl import DPOTrainer
import bitsandbytes as bnb
from google.colab import userdata
import wandb

# Defined in the secrets tab in Google Colab
hf_token = userdata.get('huggingface')
wb_token = userdata.get('wandb')
wandb.login(key=wb_token)

model_name = "teknium/OpenHermes-2.5-Mistral-7B"
new_model = "NeuralHermes-2.5-Mistral-7B"
OpenHermes-2.5-Mistral-7B 使用一种特定的聊天模板,称为 ChatML。以下是使用此模板格式化的对话示例:
<|im_start|>system
You are a helpful chatbot assistant.<|im_end|>
<|im_start|>user
Hi<|im_end|>
<|im_start|>assistant
Hi, how can I help you?<|im_end|>
如您所见,ChatML 定义了不同的角色(系统、用户、助手),并附加特殊标记( <|im_start|> 和 <|im_end|> )将它们分隔开。此外, DPOTrainer 也需要特定的格式,包含三列:提示、选择和拒绝。
我们的数据集包含四列:系统、问题、ChatGPT 和 llama2-13b-chat。我们将简单地将系统和问题列连接到提示列。我们还将 ChatGPT 列映射到“选择”,将 llama2-13b-chat 映射到“拒绝”。为了以可靠的方式格式化数据集,我们将使用标记器的 apply_chat_template() 函数,该函数已经使用 ChatML。
def chatml_format(example):
    # Format system
    if len(example['system']) > 0:
        message = {"role": "system", "content": example['system']}
        system = tokenizer.apply_chat_template([message], tokenize=False)
    else:
        system = ""

    # Format instruction
    message = {"role": "user", "content": example['question']}
    prompt = tokenizer.apply_chat_template([message], tokenize=False, add_generation_prompt=True)

    # Format chosen answer
    chosen = example['chosen'] + "<|im_end|>\n"

    # Format rejected answer
    rejected = example['rejected'] + "<|im_end|>\n"

    return {
        "prompt": system + prompt,
        "chosen": chosen,
        "rejected": rejected,
    }

# Load dataset
dataset = load_dataset("Intel/orca_dpo_pairs")['train']

# Save columns
original_columns = dataset.column_names

# Tokenizer
tokenizer = AutoTokenizer.from_pretrained(model_name)
tokenizer.pad_token = tokenizer.eos_token
tokenizer.padding_side = "left"

# Format dataset
dataset = dataset.map(
    chatml_format,
    remove_columns=original_columns
)

# Print sample
dataset[1]
{'prompt': '<|im_start|>system\nYou are an AI assistant. You will be given a task. You must generate a detailed and long answer.<|im_end|>\n<|im_start|>user\nGenerate an approximately fifteen-word sentence that describes all this data: Midsummer House eatType restaurant; Midsummer House food Chinese; Midsummer House priceRange moderate; Midsummer House customer rating 3 out of 5; Midsummer House near All Bar One<|im_end|>\n<|im_start|>assistant\n',
'chosen': 'Midsummer House is a moderately priced Chinese restaurant with a 3/5 customer rating, located near All Bar One.<|im_end|>\n',
'rejected': ' Sure! Here\'s a sentence that describes all the data you provided:\n\n"Midsummer House is a moderately priced Chinese restaurant with a customer rating of 3 out of 5, located near All Bar One, offering a variety of delicious dishes."<|im_end|>\n'}
我们可以看到提示词结合了系统和用户指令。得益于 add_generation_prompt=True 参数,它还会附加助手回答的开头部分。
Training the model with DPO
接下来,我们定义 LoRA 配置来训练模型。正如 Intel’s blog post 中所述,我们将秩值设置为与 lora_alpha 相等,这并不常见(通常为 2 * r )。我们还针对所有线性模块使用适配器。
# LoRA configuration
peft_config = LoraConfig(
    r=16,
    lora_alpha=16,
    lora_dropout=0.05,
    bias="none",
    task_type="CAUSAL_LM",
    target_modules=['k_proj', 'gate_proj', 'v_proj', 'up_proj', 'q_proj', 'o_proj', 'down_proj']
)
我们现在可以加载想要用 DPO 微调的模型。在这种情况下,需要两个模型:要微调的模型以及参考模型。这主要是为了可读性,因为如果未提供参考模型, DPOTrainer 对象会自动创建一个。
# Model to fine-tune
model = AutoModelForCausalLM.from_pretrained(
    model_name,
    torch_dtype=torch.float16,
    load_in_4bit=True
)
model.config.use_cache = False

# Reference model
ref_model = AutoModelForCausalLM.from_pretrained(
    model_name,
    torch_dtype=torch.float16,
    load_in_4bit=True
)
最后一步是为 TrainingArguments 和 DPOTrainer 提供所有超参数:* 其中, beta 参数是 DPO 特有的,因为它控制与初始策略的偏差(0.1 是典型的值)。* 与 Intel’s blog post 描述的值相比,我们降低了学习率(从 5e-4 到 5e-5)和步数(从 1,000 到 200)。在几次运行后,我手动优化了这些值以稳定训练并取得最佳结果。
现在我们可以开始训练模型了。请注意,它需要 A100 GPU,并且训练时间大约需要 1 小时。
# Training arguments
training_args = TrainingArguments(
    per_device_train_batch_size=4,
    gradient_accumulation_steps=4,
    gradient_checkpointing=True,
    learning_rate=5e-5,
    lr_scheduler_type="cosine",
    max_steps=200,
    save_strategy="no",
    logging_steps=1,
    output_dir=new_model,
    optim="paged_adamw_32bit",
    warmup_steps=100,
    bf16=True,
    report_to="wandb",
)

# Create DPO trainer
dpo_trainer = DPOTrainer(
    model,
    ref_model,
    args=training_args,
    train_dataset=dataset,
    tokenizer=tokenizer,
    peft_config=peft_config,
    beta=0.1,
    max_prompt_length=1024,
    max_length=1536,
)

# Fine-tune model with DPO
dpo_trainer.train()
我们的模型现在已进行微调。您可以在 Weights & Biases 上通过 this address查看项目。这里有一些有趣的指标供您分析:
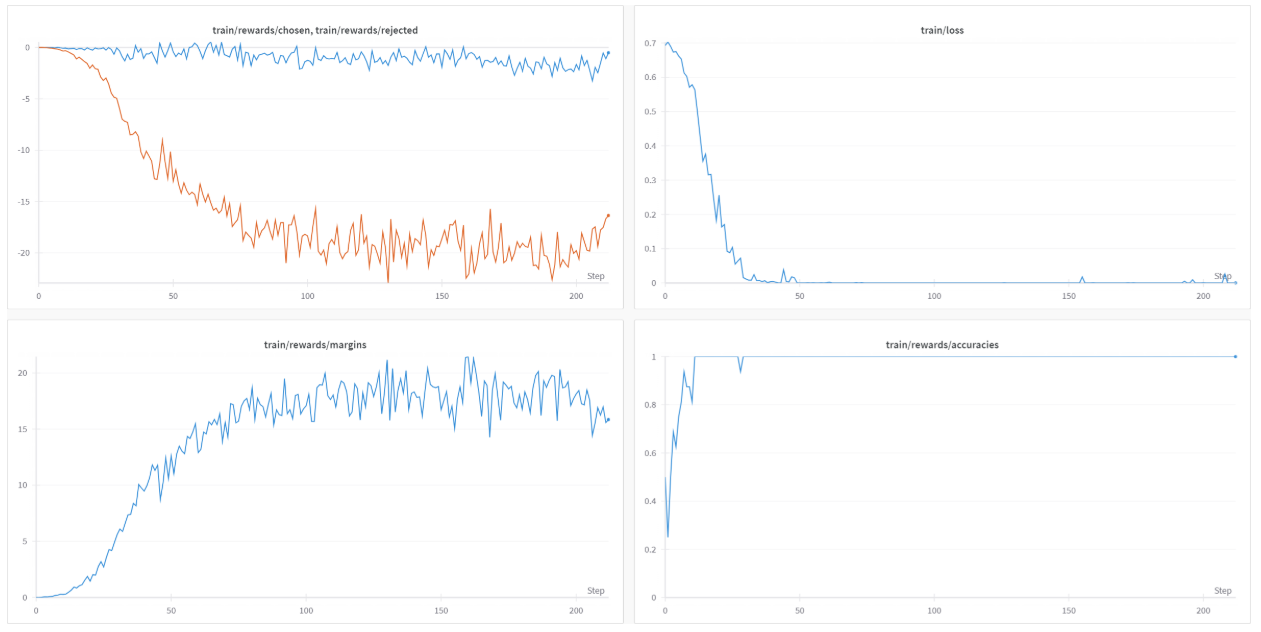
有趣的是,尽管有 100 个预热步骤,训练损失在 50 步之前迅速降至零。与此同时,其他指标仍在持续变化。
train/rewards/chosen 和 train/rewards/rejected 的图表对应于训练模型和参考模型输出的对数概率之间的平均差异。随着时间的推移,它们出现分歧是有道理的,因为我们的训练模型正在学习更受欢迎的答案。train/rewards/图表还显示了这两个图表之间的差异。最后,train/reward/accuracies 图表显示了选择更受欢迎答案的频率。训练模型迅速达到了完美的准确率分数,这是一个好迹象,但也可能意味着更受欢迎的答案和被拒绝的答案之间的差异过于明显。
现在模型已经训练完成,我们可以将适配器与原始模型合并。接下来,在将其推送到 Hugging Face Hub 之前,我们保存合并后的模型和分词器。
# Save artifacts
dpo_trainer.model.save_pretrained("final_checkpoint")
tokenizer.save_pretrained("final_checkpoint")

# Flush memory
del dpo_trainer, model, ref_model
gc.collect()
torch.cuda.empty_cache()

# Reload model in FP16 (instead of NF4)
base_model = AutoModelForCausalLM.from_pretrained(
    model_name,
    return_dict=True,
    torch_dtype=torch.float16,
)
tokenizer = AutoTokenizer.from_pretrained(model_name)

# Merge base model with the adapter
model = PeftModel.from_pretrained(base_model, "final_checkpoint")
model = model.merge_and_unload()

# Save model and tokenizer
model.save_pretrained(new_model)
tokenizer.save_pretrained(new_model)

# Push them to the HF Hub
model.push_to_hub(new_model, use_temp_dir=False, token=hf_token)
tokenizer.push_to_hub(new_model, use_temp_dir=False, token=hf_token)
让我们看看我们的模型在真实测试中的表现。我们将格式化提示以询问一个基本问题:“什么是大型语言模型?”
# Format prompt
message = [
    {"role": "system", "content": "You are a helpful assistant chatbot."},
    {"role": "user", "content": "What is a Large Language Model?"}
]
tokenizer = AutoTokenizer.from_pretrained(new_model)
prompt = tokenizer.apply_chat_template(message, add_generation_prompt=True, tokenize=False)

# Create pipeline
pipeline = transformers.pipeline(
    "text-generation",
    model=new_model,
    tokenizer=tokenizer
)

# Generate text
sequences = pipeline(
    prompt,
    do_sample=True,
    temperature=0.7,
    top_p=0.9,
    num_return_sequences=1,
    max_length=200,
)
print(sequences[0]['generated_text'])
A large language model is a type of artificial intelligence (AI) system that has been trained on vast amounts of text data. These models are designed to understand and generate human language, allowing them to perform various natural language processing tasks, such as text generation, language translation, and question answering. Large language models typically use deep learning techniques, like recurrent neural networks (RNNs) or transformers, to learn patterns and relationships in the data, enabling them to generate coherent and contextually relevant responses. The size of these models, in terms of the number of parameters and the volume of data they are trained on, plays a significant role in their ability to comprehend and produce complex language structures.
一切似乎都在正常工作,我们现在可以评估合并后的模型了。由于这是一个通用模型,我们可以利用 lm-evaluation-harness 来评估它。由于这个过程非常消耗资源,我们也可以直接将其提交到 Open LLM 排行榜进行评估。经过几天的时间,这里是与其他 OpenHermes 模型相比的结果:
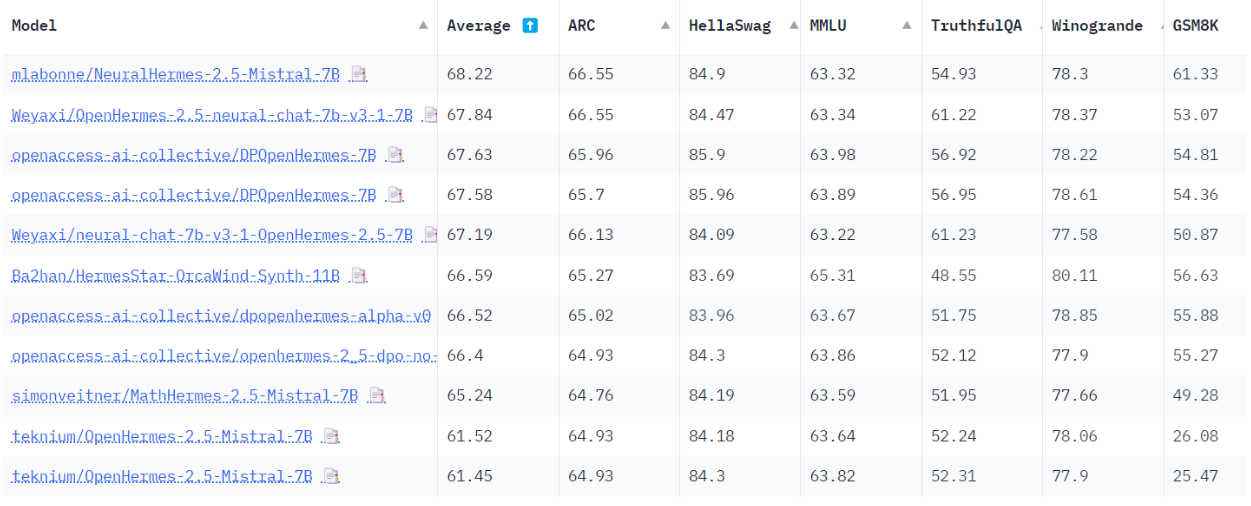
与原始模型相比,NeuralHermes-2-5-Mistral-7B 模型平均得分提高了 6.7 分(尤其是在 GSM8K 上)。这是一个出乎意料的巨大提升,展示了直接偏好优化的强大能力。
Practical Exercise: Fine-tune a model with GRPO
参考文章:实践练习:使用 GRPO 微调模型 — Practical Exercise: Fine-tune a model with GRPO
Install dependencies
!pip install -qqq datasets==3.2.0 transformers==4.47.1 trl==0.14.0 peft==0.14.0 accelerate==1.2.1 bitsandbytes==0.45.2 wandb==0.19.7 --progress-bar off
!pip install -qqq flash-attn --no-build-isolation --progress-bar off
import torch
from datasets import load_dataset
from peft import LoraConfig, get_peft_model
from transformers import AutoModelForCausalLM, AutoTokenizer
from trl import GRPOConfig, GRPOTrainer
Import and log in to Weights & Biases
Weights & Biases 是一个用于记录和监控实验的工具。我们将用它来记录我们的微调过程。
import wandb

wandb.login()
Load the dataset
我们将使用 mlabonne/smoltldr 数据集,其中包含一系列短篇小说。
dataset = load_dataset("mlabonne/smoltldr")
print(dataset)
Load model
我们将使用 SmolLM2-135M 模型。这是一个参数量为 135M 的小型模型,运行在有限硬件上。这使得模型非常适合学习,但它并不是市面上最强大的模型。
model_id = "HuggingFaceTB/SmolLM-135M-Instruct"
model = AutoModelForCausalLM.from_pretrained(
    model_id,
    torch_dtype="auto",
    device_map="auto",
    attn_implementation="flash_attention_2",
)
tokenizer = AutoTokenizer.from_pretrained(model_id)
Load LoRA
现在,让我们加载 LoRA 配置。我们将利用 LoRA 来减少可训练参数的数量,从而减少我们需要用于微调模型的内存占用。
# Load LoRA
lora_config = LoraConfig(
    task_type="CAUSAL_LM",
    r=16,
    lora_alpha=32,
    target_modules="all-linear",
)
model = get_peft_model(model, lora_config)
print(model.print_trainable_parameters())
Total trainable parameters: 135M
Define the reward function
GRPO 可以使用任何奖励函数来改进模型。在此情况下,我们将使用一个简单的奖励函数,鼓励模型生成长度为 50 个 token 的文本。
# Reward function
ideal_length = 50


def reward_len(completions, **kwargs):
    return [-abs(ideal_length - len(completion)) for completion in completions]
Define the training arguments
我们将使用 GRPOConfig 类以典型的 transformers 风格定义训练参数。
# Training arguments
training_args = GRPOConfig(
    output_dir="GRPO",
    learning_rate=2e-5,
    per_device_train_batch_size=8,
    gradient_accumulation_steps=2,
    max_prompt_length=512,
    max_completion_length=96,
    num_generations=8,
    optim="adamw_8bit",
    num_train_epochs=1,
    bf16=True,
    report_to=["wandb"],
    remove_unused_columns=False,
    logging_steps=1,
)
现在,我们可以使用模型、数据集和训练参数初始化训练器,并开始训练。在单个 A10G GPU 上训练大约需要 1 小时
# Trainer
trainer = GRPOTrainer(
    model=model,
    reward_funcs=[reward_len],
    args=training_args,
    train_dataset=dataset["train"],
)

# Train model
wandb.init(project="GRPO")
trainer.train()
Push the model to the Hub during training
如果我们设置 push_to_hub 参数为 True ,并将 model_id 参数设置为有效的模型名称,模型将在我们训练时被推送到 Hugging Face Hub。如果你希望立即开始测试模型,这会很有用!
Interpret training results
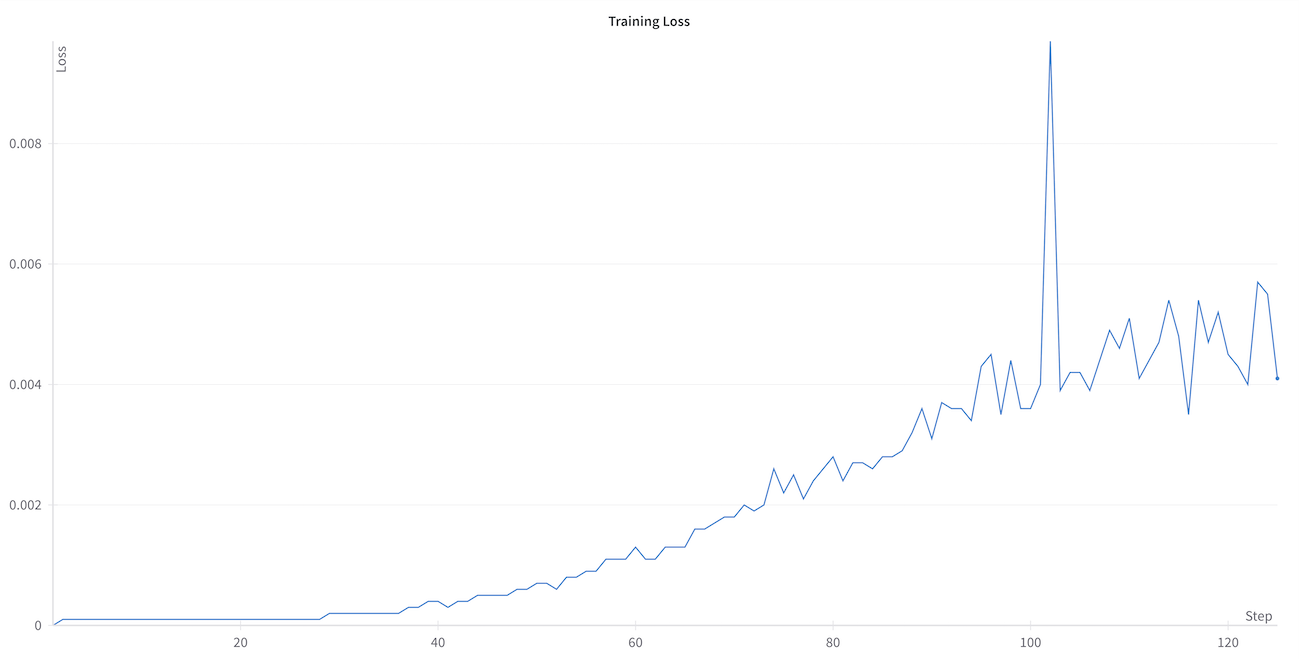
GRPOTrainer 记录来自你的奖励函数的奖励、损失以及一系列其他指标。我们将重点关注奖励函数的奖励和损失。如您所见,随着模型的训练,模型生成的文本长度正在逐渐接近50。这是一个好迹象,表明模型正在学习生成正确长度的文本。

你可能注意到损失一开始为零,然后在训练过程中增加,这看起来可能有些反直觉。在 GRPO 中,这种行为是预期的,并且直接与算法的数学公式相关。GRPO 中的损失与 KL 散度(相对于原始策略的约束)成正比。随着训练的进行,模型学习生成更符合奖励函数的文本,导致其与初始策略的偏差越来越大。这种不断增加的偏差反映在损失值的上升中,这实际上表明模型正在成功适应以优化奖励函数。
Save and publish the model
merged_model = trainer.model.merge_and_unload()
merged_model.push_to_hub(
    "SmolGRPO-135M", private=False, tags=["GRPO", "Reasoning-Course"]
)
Generate text
prompt = """
# A long document about the Cat

The cat (Felis catus), also referred to as the domestic cat or house cat, is a small
domesticated carnivorous mammal. It is the only domesticated species of the family Felidae.
Advances in archaeology and genetics have shown that the domestication of the cat occurred
in the Near East around 7500 BC. It is commonly kept as a pet and farm cat, but also ranges
freely as a feral cat avoiding human contact. It is valued by humans for companionship and
its ability to kill vermin. Its retractable claws are adapted to killing small prey species
such as mice and rats. It has a strong, flexible body, quick reflexes, and sharp teeth,
and its night vision and sense of smell are well developed. It is a social species,
but a solitary hunter and a crepuscular predator. Cat communication includes
vocalizations—including meowing, purring, trilling, hissing, growling, and grunting—as
well as body language. It can hear sounds too faint or too high in frequency for human ears,
such as those made by small mammals. It secretes and perceives pheromones.
"""

messages = [
    {"role": "user", "content": prompt},
]

# Generate text
from transformers import pipeline

generator = pipeline("text-generation", model="SmolGRPO-135M")

## Or use the model and tokenizer we defined earlier
# generator = pipeline("text-generation", model=model, tokenizer=tokenizer)

generate_kwargs = {
    "max_new_tokens": 256,
    "do_sample": True,
    "temperature": 0.5,
    "min_p": 0.1,
}

generated_text = generator(messages, generate_kwargs=generate_kwargs)

print(generated_text)